onsdag 9 juni 2021

Coolaste Studenten - The Coolest Student.

Coolaste Studenten -The Coolest Student.


Fritt temaval och ett studentkort.
Möjligheterna är oändliga och samtidigt ska det passa för just det ändamålet.
Ett kort till en ung student som kliver ut med vita hatten på. Som studerat på estetiska linjen Serieteckning och Illustration. 

Kände direkt att det grafiska är ett måste och serieteckning - hur kul är inte det att få testa på lite!
Så här blev det.
***

Free theme choice and a Graduation card.
The possibilities are endless and at the same time it has to suit for that purpose. 
A card for a young graduate student stepping out with the white Graduation cap on. Who´s studied the Art program Comic (Cartoon) drawing and Illustration.

Felt right away that the graphic is a must and comic drawing - how fun wouldn´t that be to try.
This is how it turned out.


Jag ville att det skulle vara stilrent och inte för mycket men samtidigt färgstarkt och annorlunda.
Så det första jag skapade var den vita stora texten på framsidan - Den coolaste studenten.
Ja den är handgjord. Nej det är ingen dies.

Varför gör jag sådana här saker?
Det är för att jag har en vision och oftast kan jag inte hitta dies eller saker som jag vill ha och behöver.
Så, för mig, är det enklare att skapa det jag behöver.
Ja det tar en hel del tid och går det minsta fel får jag börja om, men det är värt det.

Jag gjorde texten i Affinity Photo, skrev ut på printpapper och fäste den på slät vit CS med lite tejp (noga med att inte skada ytan) och skar ut den med min skalpell.

***

I wanted it to be clean and not too much but at the sam time colorful and different.
So the first thing I did was the big white text on the front - the coolest Graduate.
Yes it´s handmade. No not a dies.

Why I make stuff like this?
 It´s  beacuse I have a vision and often I can´t find dies or things I want and need. 
So, for me,  it´s easier to make what I need.
Yes it takes a lot of time and if it goes just a tad bit wrong I have to remake it , but it´s worth it. 

 I made the text in Affinity Photo, printed it out on printing paper and then put it on white plain CS with small bit of sticky tape ( careful not making any damage on the surface) and cut it out with my scalpel.


Efter att jag skurit ut den embossade jag med Silver Satin Pearl pulver två gånger för slät yta.
***

After I cut it out I embossed it with Silver Satin Pearl powder twice for a smooth surface.


Kortbas CS White från Bazzill.
***

Card base CS White from Bazzill.


Ramen till framsidan.
Mycket mätande och ommätande för att få till formen jag ville ha.
Varje tun linje inklusive ramen runt är 1 cm bred.
Jag ville att det skulle ha en konstkänsla och utseende som ett blad ur en seriemagasin.
***

 The frame for the front.
A lot of measuring and redoing it to get the form I wanted. Every thin line including outer line are 1cm wide. I wanted it to have a slightly artsy feeling and a comic magazine sheet look. 


Cardstockrester var perfekt att använda till färggranna paneler. Distressade rätt grovt för att skapa en djup-effekt. Ni kan se på baksidan rätta färgerna där alla delarna är fastlimmade.
***

Cardstock left overs where perfect to use for colourful panels. Distresssed the edges quite roughly to create a deep- effect. You can see the right colours  on the backside where all pieces are glued on.


Sen limmade jag på texten på backgrundpanelen.
***

Then I glued on the text on the background panel.


 Dags för detaljerna.
Jag hade olika idéer  om det men jag valde pratbubblor för att hålla det stilrent.
Ritade, färglade, skar ut och satte ihop allt på kortbasen.
***

Time for the  details.
I hade different ideas about them but I chose speak bubbles to keep a cleaner look.
Drew, coloured, cut out and put it all together on the card base.


Till insidan gjorde jag en pratbubbla, två stycken ljudeffekter och en studentmössa. 
***

For the inside I made one speak bubble, two sound effects and a Student cap.


Det är så här insidan blev.
Placerade allt text nertill och lämnade övre delen tom då önskemålet var att få lite plats att skriva.
***

This is how the inside turned out.
Placed all text on the lower piece and left the upper empty as there was a request for space to write.


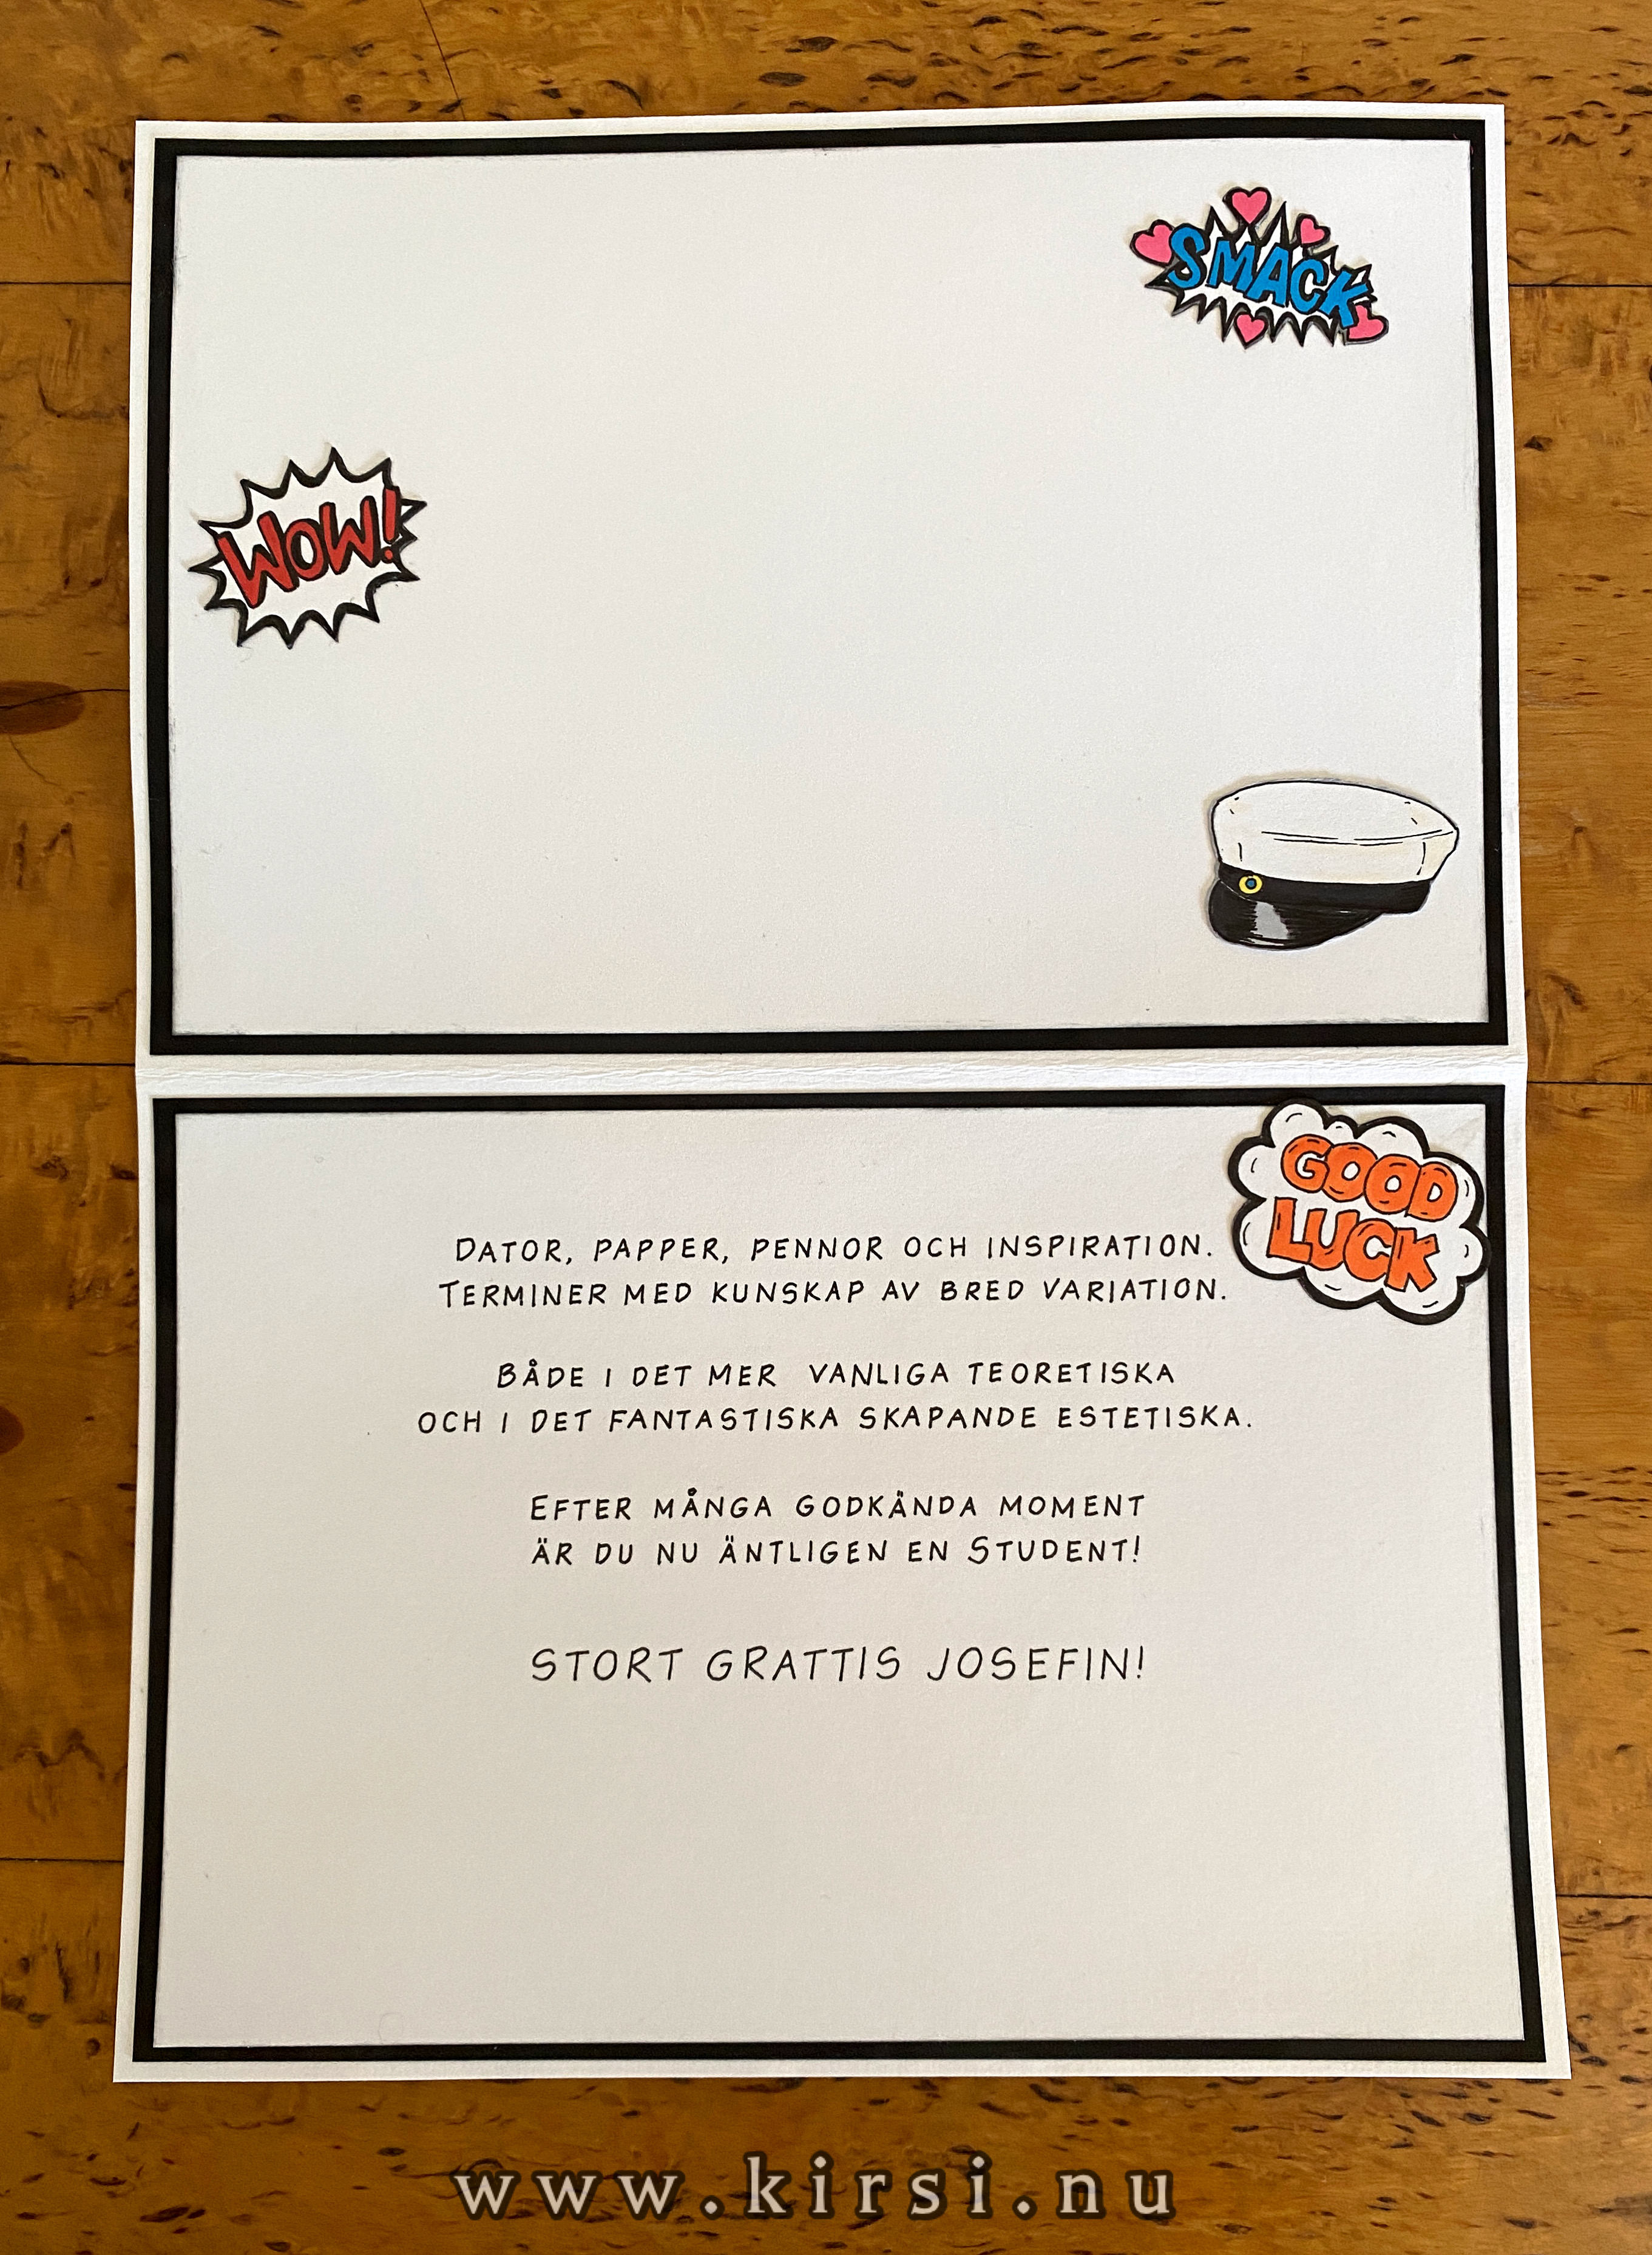
The text is a ryhm so the translation won´t sound that good but it basically says:

Computer, paper, pens and inspiration.
Semester with knowledge of wide variety.

Both in the ordinary theoretical
and in the fantastic creative aesthetics.

After many approved tasks 
you are now finally a Graduate!

 GRATULATIONS..


Beep beep / K

tisdag 1 juni 2021

Poleraren - The Polisher.

 Poleraren - The Polisher.

Detta födelsdagskort var till en man som älskar bilar. Han hade köpt ett verktygsbälte att använda när han polerade sina bilar. Hans flickvän sa att jag kunde kanske använda det som korttema om jag ville.
Så klart! Perfekt tema!
***

This birthday card was for a man who loves cars. He had bought a tool belt to use when he was polishing his cars. His girlfriend told me that I could use it for a card theme if I wanted.
Of course! Perfect theme!


Kortbas 15cm*15cm CS Bumblebee. Ram panelerna  14,5cm*14,5cm från Core´Dinations. Se bilderna.
***

Card base 15cm*15cm CS Bumblebee. Frame panels size 14,5cm*14,5cm from Core´Dinations. See pictures.


Började sen med bakgrunden till framsidan. Okänd stämpel på DP pappret från Panduro.
Du kan se före och efterbild nedan.
***

Started then with the background for the front. Unknown stamp on the DP paper from Panduro.
You can se Before and after picture below.


Gjorde bilden på poleraren.
***

Made the drawing of the polisher.


Copics till ansiktet och vita Sharpie pennan till verktygsdetaljer. 
***

Copics for the face and the white Sharpie pen for  tool details.


Klar. Dags att skära ut honom.
***

Finished. Time to cut him out.


För HURRA detaljen på framsidan.
Stansade ut bokstäverna på slät vit CS och färglade med en promarkerpenna.

Skapade för hand blänk-stjärnorna, fick justera storleken lite mer innan jag limmade allt på en bit CS Blue vibrant från Reprint storlek 14cm*2cm, med distressade kanter.
***

For the HURRA detail on the front.
Diesed out the letter on white plain CS and coloured them blue with a promarker pen.

Made the shine stars by hand, had to adjust the size a bit more befor gluing them together on a piece of CS Vibrant blue from Paper Accent, size 14cm*2cm, with distressed edges. 


Till insidan ritade jag en liten bil och skar ut den för att ha som en söt detalj.
***

For the inside a drew a small car and cut it out as a cute detail.


Texten är egen design och handskriven.
***

Text is own design and handwritten.

Text to the write says: Big shiny ( shiny as a mirror) congratulations on your twenty-seventh birthday.


Its a text that rhyms so translating it will sound weird but here we go:  

Right tools and a happy mood.
Put on the cool belt and fix a nice freshness.

Doodle and polish a bit here and there.
Show how much you love her.

But watch out so the pearl doesn´t  looses her shine
( swedish "lackar ur " means here get fed up)  
Yes she even can get a bit dull and even a bit cranky.

But with the right touch and approach style
it kan be a great joy- yes I´m talking about the car.


Beep beep / K

torsdag 27 maj 2021

Frost - Elsa - Frozen.

 Frost - Elsa - Frozen.

Det är underbart att se hur barn utvecklas - ändrar på vad de tycker om ju äldre dom blir. Jag har skapat födelsedagskort för lilla Evy tidigare och denna fyllde hon redan fem år!
Önskemålet för korttema denna gång vart så klart Frost som hon nu älskar.
***

It´s wonderful to see how children evolve - changes the things they like the older they get. I have made birthday card for little Evy before and this time she was already turning five!
The request for card theme this time was of course Frozen that she now loves.


Hon skulle fylla fem denna gång så jag kände att hon var gammal nog för att få ett lite annorlunda vikt kort. Jag valde det som kallas joy/fun fold ( glädjande/ roligt vikt) kort. Jag skulle nog kalla det dubbelglädje kort.

Det är en vikning man kan göra på många olika sätt.

Kortbas 15cm*15cm CS Admiral, rampaneler CS Sea Water allt från Bazzill.
Panelen till höger är till framsidan av lilla kortbasen.
***

She was turning five this time so I felt that she was old enough to get a slightly different folded card. I chose the so called joy/fun folded card.  I would call it a double joy card.

It´s a fold you can make in many different ways.

Card base 15cm *15cm CS Admiral, panel frames CS Seawater all from Bazzill.
The panel on on the right is for the front of the small card base.


Efter att stora och lilla kortbasen var vikta stansade jag hål i den stora korbasen. därefter ett likadant hål i ena rampanelen som skulle sitta på framsidan av stora kortet.
Cirkeldies från QuicKutz med diametern 11,5cm.
***

After folding both the big and small card base I dies a hole in the bigger card base. Afte rthat I made same same size hole on one of the frame panel for the front on the big card.
Circle dies from QuicKutz with 11,5cm i diameter.


Jag använde embossing folder för att skapa snöflingor och distressade för att få dem mer tydliga och alla kanter.
***

I used  embossing folder to make the snow flakes and distressed them to make them more marked and all edges.


Innan det lilla kortet skulle limmas in inuti det stora kortet distressade jag kanterna på en av de utskurna rampanelerna och limmade fast det. Jag ville att det skulle ge en fin ram runt det lilla kortet.
Ser mer klart ut. 
***

Before gluing the small card in to the big card I distressed the edges on one of the frame panels I cut out earlier and glued it on. I wanted it to make a nice frame around the small card.
Looks more finished.


Limmade fast CS rampanelen med hålet på framsidan av stora kortet.
***

Glued the frame CS panel with the hole ont the front of the big card.


Stansade ut två  cirklar till hålet på kortets framsida - ut och inside dekoration. 

Dom var lite mindre än själva hålet i kortet, typ några millimeter mindre.
Gjorde att dom passade bättre och inget stack ut. Utstansade på slät vit cardstock och färglagda.
***

Punched out two circles for the hole in the front - out and inside decoration. 

They were slightly smaller than the hole on the card, just a few millimeters smaller. 
Made the fit better and noting were sticking out. Diesed on plain white cardstock and coloured.


Glitter på den på utsidan. Frostig känsla.
***

Glitter on the on on the outside. Frosty feeling.


Dags för detaljerna. Jag ritade först Elsa och färglade henne.
***

Time for details. A sketched Elsa first and coloured her.


Skar ut henne, gjorde hål i ytterligare en rampanel( distressade kanter) och limmade fast dem på framsidan av lilla kortbasen.
Och Elsa fick också lite glitter.
***

Cut her out, made a hole in another frame panel (distressed edges) and glued them on the front the small card base.
And Elsa got som glitter too.


Olof dags!
Ritade, färglade, skar ut och limmade fast. Jag använde den utstansade cirkeln från Elsas rampanel som bakgrund till honom. Distresssade kanter på den med.
***

Olof time!
Sketched and coloured, cut out and glued on. I used the circle cut-out from Elsas frampanel for his background. distressed edges on that too.


Stansade ut snöflingor ( den vita på paketet) för dekoration och siffran 5 är handgjord. Allt embossat i en vinterfrostig stil.
Några strasstenar i form av stjärnor som dekoration. Hårt klistrigt lim så de släpper inte i i första taget.
***

Dies out snowflakes ( the white one o the package) for decoration and handmade the number 5. All embossed in a winter frosty look.
A few Rhinestone stars for dekoration. Hard sticky glue on them so they won´t easily come off.


En ensam stor blå pärla på framsidan.
***

One single big blue pearl on the front.


För HURRA- bokstäverna använde jag min lilla bokstavsdies. Samma cardstock som kortbaserna.
***

For the  HURRA letters I use my small letter dies.Same cardstock as the card bases.


Syns dåligt men jag använde Wink of Stella Clear 999 på Olof för snöglitter effekt.
***

Hard  to see but I used Wink of Stella clear 999 on Olof for snow glitter effect.


Texten inuti handskriven och bokstäverna färglagda samma som ringen och runt kanterna på Olof.
***

The text inside is handwritten and letters coloured, same as the ring and around the edges on Olof.


Beep beep /K

Slayer Python.

Slayer Python.  Ett födelsedagskort till en speciell person som gillar Slayer och Monty Python.  Så jag slog ihop dem två till detta. Ja det...