Visar inlägg med etikett pyssel. Visa alla inlägg

torsdag 8 juli 2021

Grönrandig Burk -Green Striped Can.

Grönrandig Burk -
Green Striped Can.

Du kan aldrig ha för många.
Jag har gjort några av dessa burkar tidigare. Dom är så bra att ha saker i som till exempel stickor för stickning - som denna var till för.
***

You can never have to many.
I have done a few of these cans before. They are great to store stuff like knitting needles for knitting - like this one was for.


Denna gång skar jag inte burken kortare, jag behövde den i fullängd. Gjorde ett svart streck med en promarkerpenna så det orangea färgen inte skulle sticka ut i pappersskarven.

DP Green & Kraft Ribbon Stripe CC 2334 från Canvas Corp.
***

This time I did not cut the can shorter, I needed it in full length. Made a black line with promarker pen so the Orange colour wouldn´t peer out where the paper edges meets. 

DP Green & Kraft Ribbon Stripe CC 2334 
from Canvas Corp.


Till dekoration ville jag hålla det enkelt så en vit spetsbård utstansat med en Martha Stewart stans på vit slät cardstock.
***

For decoration I wanted it to be simple so a white lace edging punched out with a Martha Stewart punch on white plain cardstock.


Skar ut två smala gröna remsor från samma DP som jag sen limmade på runt topp och botten för att få en snyggt avslut.
***

Cut of two thin green strips from the same DP that I then glued on round 
the top and bottom to make a nice ending.


Jag såg alla runda pappersbitar - överblivet efter utstansning av spetsbården - och kände att det kunde bli en fin stilren detalj. Limmade fast dem en och en.
***

I saw all the round paper pieces - leftovers after punching out the lace edging - and felt that that would be a nice clean detail. Glued them on one by one.


Och sen var den färdig.
***
And then it was finished. 


Beep beep / K

tisdag 15 juni 2021

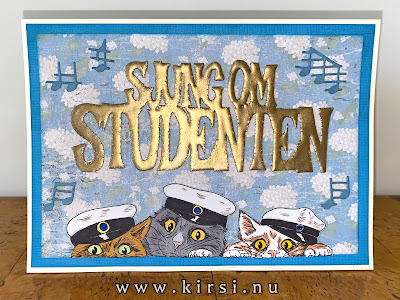
Sjung om Studenten- Sing about the Student.

 Sjung Om Studenten - Sing About The Student.


Fick en kortbeställning.
Det var till en ung kvinna som studerat djurvårdsprogrammet och jag använde
djur som tema till att skapa ett personligt studentkort till henne.
***

Got a card order.
It was for a young woman who has studied the animal care program and I used
animals as a theme to make her a personal graduation card.


Kortbas 17,5cm*12,5cm CS French Vanilla, Bazzill.
***

Card base 17,5cm* 12,5cm CS French Vanilla, Bazzill.


Rampanelerna till framsidan och insidan. CS Evening surf, Reprint. 
Samma storlek på alla tre blå ramdelarna.

DP Vintage Summer Basics från Maja Design.
Alla kanterna distressade med Broken China.
***

Frame panels for the front and inside. CS Evening Surf, Paper Accent.
Same sizes on all three blue frame panels.

DP Vintage Summer Basics from Maja Design. 
All edges distressed with Broken China.


Skapade texten till framsidan.

Jag gjorde mallen i Affinity Photo. Printade ut och med små rullade bitar av
tejpfäste jag den på vit slät cardstock.

Använde min skalpell för att skära ut den. Tog en stund och knivbladet måste vara
väldigt vasst( nytt) så man inte river sönder. Och väldigt försiktig.
***

Made the text for the front.
(It says "Sing about the Student" it´s a part of a phrase from the traditional
graduation song).

I made a template in Affinity Photo. Printed and with small pieces of rolled
stickytape attached it to white plain cardstock.

Use my scalpel to cut it out. It took a while and the knife blade needs to be very
sharp (new) so you don´t tear it. And very careful.


Jag var inte säker på vilken färg skulle passa med designpappret (DP) jag valt.

På bilden nedan kan du se alla tre pulvren och färgen jag embossade de första
tre gångerna med och gillade inte resultatet.
Den bara försvann mot Maja Design DPn.
***

I wasn´t sure what colour would suit with the Design Paper (DP)  I chose.

In the picture below you can see all the three powders and the colour I embossed it
with the first three times first and didn´t like the result.
It just fell flat agains the Maja Design DP.


Till slut valde jag att att embossa med guldpulver och det såg så mycket bättre ut.
Fick ta det väldigt försiktig så det inte blev förstört.
Mycket embossingvätska på slutet men jag tog det väldigt varligt med
embossingfönen.
***

I chose at the end to emboss with gold powder and it looked so much better.
Had to be very cautious not to messed it up.
A lot of embossing liquid at the end but I used the embossing heating tool with
great care. 


Dags att rita. Gjorde djuren och färglade dem.
Wink of Stella 999 på kattögonen och på kokarden -knappen på studentmössan.
***

Time to draw. 
Made the Animals and coloured them.
Wink of Stella 999 on the eyes of the cats and on the  cockade - the button on the 
graduation cap.


Skar ut dem och gjorde klart framsidan med lite musiknoter som fin detalj.
***

Cut them out and finished the front with some music notes as a nice detail.


Texten inuti är egen design och handskriven.
***

The text iside is own design and handwritten.


This text also rhymes in Swedish so of course it sound better in Swedish
than english. ;)

It says:

After years with homework,
tasks, exams and practice.

Many subjects to studie including
animal care and mathematics.

Has the big final day come-
for now you ar at last a Graduate.


And here it says: 

Put on the cap and. bawl loudly!

Hugh congratulations and loads of well wishing on Graduation day!


Beep beep / K

fredag 7 maj 2021

Som Blixten -Like the Flash.

 Som Blixten -Like the Flash.

Ett födelsedagskort till en man som är en underbar snäll bror och älskad av sin familj och vänner. Han älskar att trampa mil efter mil på sin cykel.
Perfekt tema till ett pop upp kort.
***

A birthday card for a man who is a wonderful brother and loved by his family and friends. He loves to pedal for miles and miles on his bicycle.
Perfect theme for a pop up card.


Till kortbasen använde jag CS Admiral från Bazzill. Gjorde skåror till vikningen.
***

For the card base I used CS Admiral from Bazzill. Scored for the folding.  


Här ser du måtten till pop upp kortbasen.
Röda markeringarna visar vart jag skårade men observera vart den gula linjen är.
Ingen skåra på den delen!
Det är baksidan av kortet och jag ville att de skulle vara intakt och inte vikas alls.

Grön markering är skårade och klippta ner till röda markeringen.
***

Here you see the measurements for the pop up card base.
Red marks shows where I made the scoring but observe where the yellow line is.
No scoring on that part!
 It´s the back side of the card and I wanted it to be intact, not to fold at all.

Green marks = scored and cut down to the red marks.


Jag klippte av toppen på den smala änddelen (till höger i bild) på snedden för att göra den mindre synlig.
***

I cut the top of the little small end piece ( the right side of picture) in an angle to make it less visible. 


Här är den klippt och sen limmad ihop.
***

Here it is cut and then glued together.


Sen remsorna 1,5cm* 9,5 cm.  Med 1cm vikt kant i ändarna.
Minns inte måtten mellan dem - det beror på hur många remsor du vill ha och vad du vill visa upp.
Men det viktiga är att när du limmar fast remsorna att du viker kortet då hamnar dom rätt.
***

Then the strips 1,5cm * 9,5cm.  With 1cm folded ends.
Don´t remember the measurements between them - it depends how many strips you want to have and what you will display.  But the important thing is when you glue them on that you fold the whole card, the strips will get in the right place.


Dags för panelerna. Storlek 9cm * 6,5cm på dom stora och 9cm * 4,5cm på dom mindre delarna.
Två olika DP, se bilderna en bit nedan.
Den överkryssade var en för mycket av de små. Jag gjorde en större till baksidan.
Alla kanterna distressade.
***

Time for the panels. Sizes 9cm * 6,5cm the big ones and 9cm * 4,5cm the maller pieces.
 Two different DP, see picture further down.
The one crossed over was one too many of the small ones. I made a larger one for the hole back.
All the edges distressed.


De två olika DPn jag använde till panelerna.
***

The two different DPs I used for the panels.


Så här ser den ut stängd.
Paneler på både övre och nedre delen för att få det att se fint ut.
***

This is how it looks closed.
Panels on both upper and lower part to make it look pretty.


En bit av CS Vibrant Blue från Reprint till bakgrund, distressade kanterna.

Och gjorde en cirkel som bas för en sol. CS Buttercup från Reprint. Cirkeldies från QicKutz.
***

A piece of CS Vibrant Blue from Paper Accents as a background, disstressed the edges.

And made a circle as a bas for the sun. CS Buttercup from Paper accents. Circle dies from QuiKutz.


Av två olika gula, CS Buttercup and Candlelight CS från Reprint skapade jag solen för hand- inga mått. Jag klippte cirkeln för att passa i hörnet innan jag limmade på solstrålarna.
Lite testa och gör om tills jag fick till det. ;)

Distressade kanterna och ute på sidorna för att få en ljusare/mörkare effekt.
***

With two different yellow CS Buttercup and Candlelight from Paper Accents I created the sun by hand - no measurements. I cut the circle to fit the corner before gluing the sun rays on.
A bit of trial and error before I got it right. ;)

Distressed around edges and on the sides for a lighter / darker effect. 


Två handgjorda moln. ville ah en 3D effekt så jag limmade på 3 lager med CS bitar på deras baksida och jag hade på lite Chipped Sapphire distress på för att "puffa" upp dem.
***

Two handmade clouds. Wanted the 3d effect so I glued on 3 layers of CS pieces on their backs and I had a little Chipped Sapphire distress on the clouds to "puff" them up.


Detaljerna. Bokstäver på vit slät CS och färglagda med promarkerpennor.
***

The details. Letters on white plain CS and coloured with Promarker pens.


Limmade fast dem och hade på Wink of Stella Clear 999 på bokstäverna.
***

Glued them on and used Wink of Stella Clear 999 on the letters.


Blixten på cykeln.
färglagt och utskuren och sen limmad igen på tunnare mörkblå papper för att ge den lite mer styvhet och en fin baksida.
De små detaljerna är viktiga i mitt tycke, känns mer klart.
***

The Flash on the bike.
Coloured and cut out and then glued again on thinner dark blue paper to make it a bit solid and giving it a nice backside.
Those small details are important in my opinion, feels more finished.


Gräset handgjort, skuret med skalpell.
Hararna handgjorda och utskurna. Ekorren från en dies. Allt på slät vit CS och målade med svart promarker.
***

The grass handmade cu with a scalpel.
 Hares handmade and cut out. Squirrel from a dies. All on plain white CS and coloured with black Promarker.


Numren. Handgjorda på vit slät CS.
Färglagda och embossade ( dvs stämpla med genomskinlig Versafine,  sen pulver på och värme som ger en blank yta).
Några bärnstensfärgade strasstenar till dekor.
***

The numbers. Handmade on white plain CS.
Coloured and embossed. A few Amber-coloured rhinestones for decor.


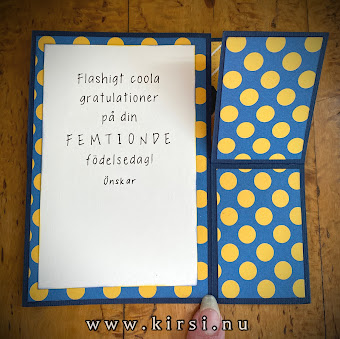
Baksidan. Text egen design och handskriven.
Distressade kanterna med båda stämpelfärgerna. Noga med att inte överlappa och bli grönt.
***

The back. Text own design and handwritten.
Distressed the edges with both inks. Making sure  not overlapping and turn green.


It says:
Flashy cool congratulations on your fiftieth birthday!
wishes


Beep beep / K

Slayer Python.

Slayer Python.  Ett födelsedagskort till en speciell person som gillar Slayer och Monty Python.  Så jag slog ihop dem två till detta. Ja det...