torsdag 27 maj 2021

Frost - Elsa - Frozen.

 Frost - Elsa - Frozen.

Det är underbart att se hur barn utvecklas - ändrar på vad de tycker om ju äldre dom blir. Jag har skapat födelsedagskort för lilla Evy tidigare och denna fyllde hon redan fem år!
Önskemålet för korttema denna gång vart så klart Frost som hon nu älskar.
***

It´s wonderful to see how children evolve - changes the things they like the older they get. I have made birthday card for little Evy before and this time she was already turning five!
The request for card theme this time was of course Frozen that she now loves.


Hon skulle fylla fem denna gång så jag kände att hon var gammal nog för att få ett lite annorlunda vikt kort. Jag valde det som kallas joy/fun fold ( glädjande/ roligt vikt) kort. Jag skulle nog kalla det dubbelglädje kort.

Det är en vikning man kan göra på många olika sätt.

Kortbas 15cm*15cm CS Admiral, rampaneler CS Sea Water allt från Bazzill.
Panelen till höger är till framsidan av lilla kortbasen.
***

She was turning five this time so I felt that she was old enough to get a slightly different folded card. I chose the so called joy/fun folded card.  I would call it a double joy card.

It´s a fold you can make in many different ways.

Card base 15cm *15cm CS Admiral, panel frames CS Seawater all from Bazzill.
The panel on on the right is for the front of the small card base.


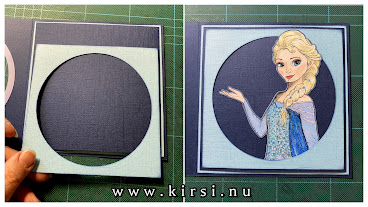
Efter att stora och lilla kortbasen var vikta stansade jag hål i den stora korbasen. därefter ett likadant hål i ena rampanelen som skulle sitta på framsidan av stora kortet.
Cirkeldies från QuicKutz med diametern 11,5cm.
***

After folding both the big and small card base I dies a hole in the bigger card base. Afte rthat I made same same size hole on one of the frame panel for the front on the big card.
Circle dies from QuicKutz with 11,5cm i diameter.


Jag använde embossing folder för att skapa snöflingor och distressade för att få dem mer tydliga och alla kanter.
***

I used  embossing folder to make the snow flakes and distressed them to make them more marked and all edges.


Innan det lilla kortet skulle limmas in inuti det stora kortet distressade jag kanterna på en av de utskurna rampanelerna och limmade fast det. Jag ville att det skulle ge en fin ram runt det lilla kortet.
Ser mer klart ut. 
***

Before gluing the small card in to the big card I distressed the edges on one of the frame panels I cut out earlier and glued it on. I wanted it to make a nice frame around the small card.
Looks more finished.


Limmade fast CS rampanelen med hålet på framsidan av stora kortet.
***

Glued the frame CS panel with the hole ont the front of the big card.


Stansade ut två  cirklar till hålet på kortets framsida - ut och inside dekoration. 

Dom var lite mindre än själva hålet i kortet, typ några millimeter mindre.
Gjorde att dom passade bättre och inget stack ut. Utstansade på slät vit cardstock och färglagda.
***

Punched out two circles for the hole in the front - out and inside decoration. 

They were slightly smaller than the hole on the card, just a few millimeters smaller. 
Made the fit better and noting were sticking out. Diesed on plain white cardstock and coloured.


Glitter på den på utsidan. Frostig känsla.
***

Glitter on the on on the outside. Frosty feeling.


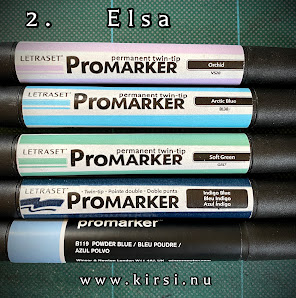
Dags för detaljerna. Jag ritade först Elsa och färglade henne.
***

Time for details. A sketched Elsa first and coloured her.


Skar ut henne, gjorde hål i ytterligare en rampanel( distressade kanter) och limmade fast dem på framsidan av lilla kortbasen.
Och Elsa fick också lite glitter.
***

Cut her out, made a hole in another frame panel (distressed edges) and glued them on the front the small card base.
And Elsa got som glitter too.


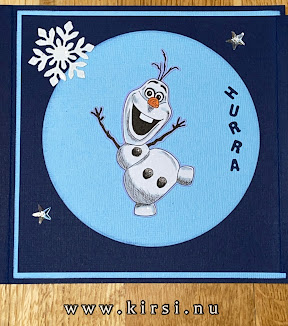
Olof dags!
Ritade, färglade, skar ut och limmade fast. Jag använde den utstansade cirkeln från Elsas rampanel som bakgrund till honom. Distresssade kanter på den med.
***

Olof time!
Sketched and coloured, cut out and glued on. I used the circle cut-out from Elsas frampanel for his background. distressed edges on that too.


Stansade ut snöflingor ( den vita på paketet) för dekoration och siffran 5 är handgjord. Allt embossat i en vinterfrostig stil.
Några strasstenar i form av stjärnor som dekoration. Hårt klistrigt lim så de släpper inte i i första taget.
***

Dies out snowflakes ( the white one o the package) for decoration and handmade the number 5. All embossed in a winter frosty look.
A few Rhinestone stars for dekoration. Hard sticky glue on them so they won´t easily come off.


En ensam stor blå pärla på framsidan.
***

One single big blue pearl on the front.


För HURRA- bokstäverna använde jag min lilla bokstavsdies. Samma cardstock som kortbaserna.
***

For the  HURRA letters I use my small letter dies.Same cardstock as the card bases.


Syns dåligt men jag använde Wink of Stella Clear 999 på Olof för snöglitter effekt.
***

Hard  to see but I used Wink of Stella clear 999 on Olof for snow glitter effect.


Texten inuti handskriven och bokstäverna färglagda samma som ringen och runt kanterna på Olof.
***

The text inside is handwritten and letters coloured, same as the ring and around the edges on Olof.


Beep beep /K

måndag 17 maj 2021

Se upp! - Watch Out!

Se Upp - Watch Out!


Mamma i farten jag tror att många av er vet hur det är.
En beställning på ett kort till en kvinna som jag gjort kort till tidigare. 
Hon har mycket att stå i varje dag precis som varje förälder har på väg både hit och dit.

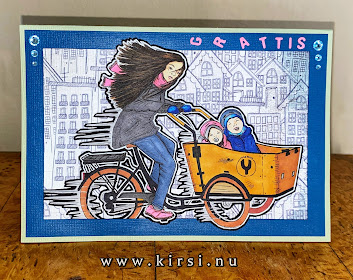
Denna gång var önskemålet om jag kunde rita hennes elcykel med henne och barnen. Inte det lättaste att skapa. En utmaning!
***

Mum in a hurry I think many of you know whats thats like.
Got an order for a card to a woman that I have made card for before. 
She has a lot on her plate every day like all parents have going both here and there.

This time the request was if I could draw her electric bike with her and her kids. Not the easiest thing to create. A challenge!


Kortbas CS Aloe Vera , Bazzill. Rampanelerna CS Portal Blue Core´Dinations.
Storlekar se bilderna nedan.
***

Card base  CS Aloe Vera , Bazzill. Frame panels CS Portal Blue Core´Dinations.
Sizes see pictures below.


En av de blå panelerna skar jag ut till en ram och alla kanterna på all tre delarna blev distressade.
***

One of the blue panels I cut out as a frame and all edges on all the three pieces were distressed.


Nästa var bilden. Tog ett tag att få till den, några fel så jag fick göra om den en gång.
Sen färgläggning och skära ut den.

1. Copics till ansiktena, E57 för hennes håret.
2. cykeln och bakgrunden.
3. Kläder.
***

Next was the picture. Took a while to make it, a few errors so had to redo it once.
Then colour it and cut it out.

1. Copics for the faces, E57 for her hair.
2. The bike and background.
3. Clothes.


DP från Panduro som bakgrund till framsidan av kortet.
***

DP from Panduro for the background on the front of the card.


Använde slät vit CS till dom utstansade små bokstäverna.
Färglade dem innan jag limmade fast dem i en typ "fartfylld stil" och några strasstenar för den kompletta looken på kortet.
***

Used plain white CS for the diesed small letters.
Coloured them before gluing them on in a kind of "hurry style" and a few rhinstones to complete the look of the card.


Cykeln är satt halvvägs utanför ramen då det ger en mer 3D känsla.
Mer i rörelse.
***

The bike is placed halfway outside the frame cause it gives it a more 3D feeling.
More on the move.


Insidan.
Text own design and handwritten. Edges distressed.
***

The inside.
Text egen design och handskriven. Kanterna distressade.


Text translations:

Life is 
like a powerful roller-coaster.
You can choose to either close your eyes and scream
yourself hoarse at every little bump.
Or fix your gaze forward and  enjoy to the max!


Hold on and watch out!
Fast(pacey) thunderous hurrah cheers on 35th birthday!


Beep beep /K

måndag 10 maj 2021

Solas.

Solas.

Gjort flera olika födelsedagskort till denna födelsedagstjej och årets tema till hennes kort blev Dragon Age och den var lite klurig men detta blev slutresultatet.

Här nedan ser ni framsidan till skärmkortet.
***

Done several different birthday cards for this birthday girl and this years theme for her card was Dragon Age and it was a bit tricky but this is the end result.

Here you see the front of the screen card.


Jag visste nästan direkt att jag ville göra ett skärmkort.

Kortbas 30*17cm CS Raven Bazzill.
Ville ha en fin nederdel på skärmen. Först mätte jag hur högt upp jag ville att den skulle hamna - valde 1,5cm då den skulle se mest rätt ut med tanke på formen på stansen.
***

 I almost immediately knew that I wanted to make a screen card.

Card base 30*17cm CS Raven, Bazzill.
Wanted a pretty base for the screen. First I measured how far up I wanted it do be-  chose 1,5cm cause it would look most right with the form of the dies.


Sen mätte jag storlekarna för varje skärmdel. Bigning vid 10cm och 20 cm lite senare men först...

Jag gjorde en pappersremsa med markering vid varje 5 cm för att göra det enklare att veta vart jag skulle sätta stansen.  Remsan är kort men jag har mätt från carstockens kant.

Jag mätte ut mitten på själva stansen och gjorde en liten markering som ni kan se på bilden nedan.
***

Then I measured the size for each screen. Scoring at 10cm and 20 cm later on but first...

I made a paper strip with marks at every 5cm to make it easier to know where to put the dies.
The strip is short but I have measured from the edge of the cardstock.

I measure the middle of the dies and made a small mark on it as you can see on the picture below.


Efter det bigning. Jag använde min stora scoring board från Martha Stewart. 
***

After that scoring. I used my big Martha Steward Scoring Board.


Så är basen till kortet gjord.
***

So the base of the card is done.


Dags att rita.Team Dragon Age- inte det enklaste måste jag säga. Visste inte nått om det så jag fick googla en massa men jag gillar alltid en skapelseutmaning.

Så nu kör vi. Först loggan.
***

Time to draw. Theme Dragon Age- not the easiest I have to say. Didn´t know anything about it so I had to google a lot but I always like a craft challenge.

Here we go. first the logo.


Sen halsbandet.
***

Then the necklace


Och slutligen Solas
***

And last Solas.


Panelerna DP från Gorjuss, Santoro.
Gjorde först 3 stycken till framsida men jag gjorde ytterligare 3 stycken till baksidan,  att ha bakom texterna.
distressade kanterna på alla panelerna (alla6 stycken).
***

The panels DP from Gorjuss, Santoro.
Made first 3 pieces for the front but I did make another 3 more pieces to the back,  to have behind the texts.
Distressed the edges on all panels ( all 6 pieces).


Siffrorna skar jag ut för hand, vit slät CS och distressade och embossade dem.
Valde dom Versa färgerna för att likna lite färgerna av Solas kläder och även se lite gammalt och slitet ut.
***

The numbers I cut out by hand, white plain CS and distressed and embossed them.
Chose those versa colours to resemble a tad the colours of Solas clothes and also look a bit old and worn.


Så dags att sätta ihop allt och lägga till lite dekorationsdetaljer.
***

So time to put it all together and put som decoration details.


Och baksidan med all text.Allt handskrivet. Två citat från spelet.
***

And the back with all the text.All handwritten.  Two quotes from the game.


Gjorde en spelladdningssymbol.
***

Made a game loading symbol.


Bara DP panelernas kanter är distressade.
***

Only the DP panel edges are distressed.


Beep beep / K


Birdy.

 Birdy. Skapade detta söta födelsedagskort till min farbror. Detta är gjort med akvarellfärger. *** Created this cute birthday card for my u...